How to screen your porch with this DIY step-by-step tutorial.
One of the many blessings of our house are the porches … not one, not two, but three. It quickly became apparent that our most used porch would be the side porch … the one off the kitchen. I’ve shared how we prepped and stained the posts and deck, and how we screened the porch. After about a week of dining on the porch, we noticed that “others” were joining our activities … “others” being those of the 6 and 8-legged variety, even some with wings. Yikes! This would NOT do. NO, NO, NO!
Were we surprised? Not really. The porch is raised above ground level, and the decking is not a solid surface. We knew it would just be a matter of time before our southern critters would move in. And move in they did … stink bugs, wasps, spiders … EWWWWW!!!!!
We went back to the drawing board and began researching various ways to keep these bugs outside. Should we cover the decking with 4’x8′ hardwood? How about plywood and tile? Or better yet … brick pavers! (I was all for the brick pavers.) Ultimately it is our dream to turn this porch into a sun room with finished walls and windows. Keeping that goal in mind, we didn’t want to put out a lot of cash on something that may end up having to be removed in a few years. So after a bit of hemming and hawing, we chose to do an under porch screen installation. It was the least time-consuming, most cost-effective option.

Visual Inspection & Cleaning
The first thing to do is scoot under the porch and inspect it. You’ll want to wear safety glasses and gloves … just in case. This is a great time to make sure that everything is sound, there is no dry rot, and most of all, that none of the guests that you are evicting have set up sleeping quarters under there. Brush away all the cobwebs and remove any nests.

Measure Twice, Cut Once
While you are under the porch, measure how far apart your support beams are. They should be an even measurement … 14″ (on center), 16″, 18″, etc. Also measure the length. Screen rolls come in various widths and lengths. When purchasing your rolls, if you can’t get the exact width that matches your measurements, then go to the next higher width. For the length, try to purchase rolls that will allow each strip to be one continuous strip.

Under Porch Screen Installation
Materials …
Staple gun and staples
Sharp scissors
Screen
Safety glasses
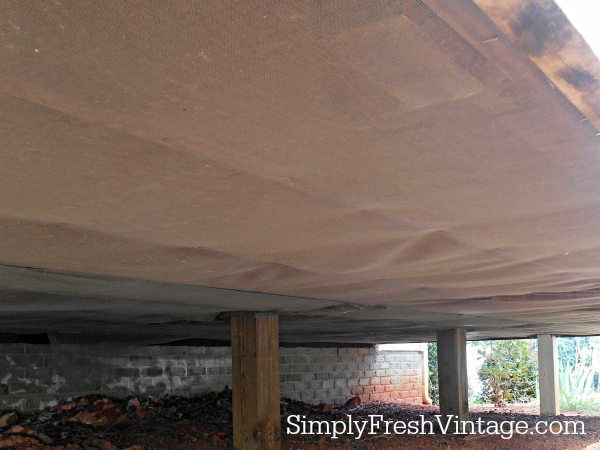
This screen installation is much easier than the exterior wall panels. Beginning on one end of the porch, staple the screen to the outer support beam. Making sure that the screen runs evenly along the support beams, continue stapling until you reach the other side. Staple along all support beams and cross beams … basically wherever the screen is touching wood, staple. You can’t have too many staples!


When you get to the corner posts and posts in between, you’ll want to trim the screen accordingly. You may need to go back and add small sections of screen underneath the strips so that you have some way of securing and stabilizing the screen at the posts. You might have to get creative!

After you’ve finished running all of your screen strips and wrapped your posts, go back and make sure that everything is secure, adding extra staples as needed. Remember, you don’t want any chance of critters finding their way in. Trim away any excess screen material as needed.
And that’s it!
Not the most glamorous of projects, I’ll admit, but if it keeps my porch bug free, then it’s definitely worth it. Our porch is 12′ x 20′. and it took a couple of hours one Saturday morning to install the screen under the porch.
Now that we’ve completed all the staining and screening, it’s time for some new furnishings and decorations. I can’t wait!
Are you a porch lover? How do you use your porch?